How to create a DNS server using BIND in Centos 7
We all know that domains need name servers to operate. As part of a simple project covered in this blog, one of the tasks is to create a DNS server to serve name servers for domains. There are various DNS software such as BIND, PowerDNS, djbdns, NSD and a few more. Some of the functions of a nameserver include:
- Answering queries about your website’s hostname and IP
- Asking about both local and remote hosts for your users
- Caches answers to queries so it can answer faster next time
- Transfers data between your name servers and keeps them synced
Let’s have a look on how you can set up your own DNS server
Prerequisites
- A Virtual Private Server (VPS) to serve as the primary nameserver (ns1)
- Optionally, another VPS to serve as a secondary nameserver (ns2). In our case, we will use the same VPS for primary and secondary nameservers
- Root access to the server(s) above
What do we want?
To create nameservers that can be used make a domain go live. By the end of this article, you should have 2 working nameservers ns1.example.com and ns2.example.com that can be used with domain names to make your website go live.
Procedure
1. Attach your domain example.com to a hosting package and create two A records: ns1.example.com and ns2.example.com. Point the two to your server IP. If you’d like free hosting, visit Truehost Cloud and register the domain with them. You’ll get hosting for free.
2. At your registrar’s client area, register your nameservers so as to create GLUE records. Different registrars have different client areas thus the procedure may differ. But I expect each will provide assistance on how to accomplish this on their platform.
After this has been configured, it may take up to 24hours for the DNS to propagate.
3. Login to your VPS as root.
4. a) Install latest version of BIND and bind utils
[root@dns
~]# yum install bind bind-utils -y
bind-utils installs important dns tools such as dig, host and nslookup
b) Start and enable bind
[root@dns
~]#
systemctl start named
[root@dns
~]#
systemctl enable named
5. Create forward zone files.
At this point we will create 3 forward zone files: 1 for each nameserver and 1 for the domain we intend to host. Each additional domain to use with our nameservers will need to have it’s zone files created .
-
Navigate to
/var/named
[root@dns ~]# cd /var/named/ - The domain we will use with our nameservers is called example.co.ke. Thus we will create a zone file and name it example.co.ke.db Once created, we will add the following content to the file.
;
;
BIND data file for  example.co.ke
;
$TTL
   3h
@
IN SOA ns1.example.com. example@gmail.com.
(
1
       ; Serial
1h
      ; Refresh after 3 hours
1h
      ; Retry after 1 hour
1w
      ; Expire after 1 week
1h
)     ; Negative caching TTL of 1 hour
;
@
      IN      NS      ns1.example.com.
@
      IN      NS      ns2.example.com.
example.co.ke.
   IN      MX      0      mail.example.co.ke.
example.co.ke.
   IN      A       51.38.81.101
www
                    IN      CNAME   example.co.ke.
mail
                   IN      A       51.38.81.101
ftp
                    IN      CNAME   example.co.ke.
Note that the A record of the domain in the zone file above points to a different IP. This is the IP of the web server. You may as well create the MX records pointing elsewhere, to the mail server if it’s separate.
- Do the same for the nameservers. Create a file called ns1.example.com.db and add the following content in it:
;
;
BIND data file for  ns1.example.com
;
$TTL
   3h
@
IN SOA ns1.example.com. example@gmail.com.
(
1
       ; Serial
1h
      ; Refresh after 3 hours
1h
      ; Retry after 1 hour
1w
      ; Expire after 1 week
1h
)     ; Negative caching TTL of 1 hour
;
@
      IN      NS      ns1.example.com.
@
      IN      NS      ns2.example.com.
ns1.example.com.
   IN      MX      0      mail.ns1.example.com.
ns1.example.com.
   IN      A       167.114.169.229
www
                    IN      CNAME   ns1.example.com.
mail
                   IN      A       167.114.169.229
ftp
                    IN      CNAME   ns1.example.com.
NOTE: Please note the difference in the two zone files above. The A record for the domains’s zone file points to a separate web server but the nameserver point to the IP of the DNS server – which is the server itself.
- domain ip → web server (51.38.81.101)
- name server ip → name server (167.114.169.229)
After that, copy ns1.example.com.db to the other DNS server ns2.example.com.db and replace the occurrence of ns1.example.com with ns2. example.com in the MX, WWW and FTP lines of the zone file.
At this point, you have three zone files: example.co.ke.db, ns1.example.com.db and ns1.example.com.db. These allow the domains names to be mapped onto IPs
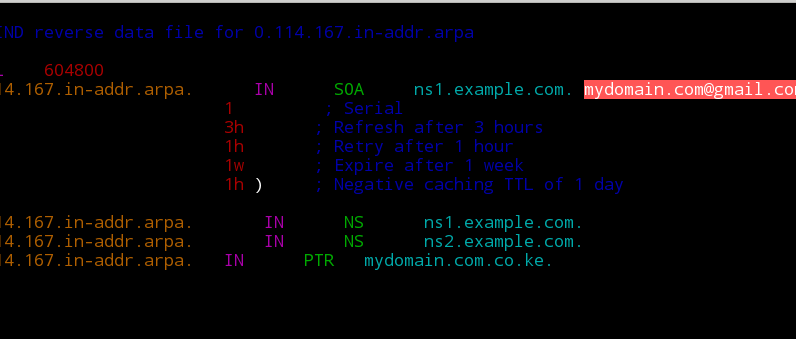
6. Create reverse zones
The reverse zone files map IPs back to domain names. If your IP for the DNS server is 167.114.169.229 then create a zone file called 167.114.169.229.db and populate it with the following text:
;
;
BIND reverse data file for 0.114.167.in-addr.arpa
;
$TTL
   604800
0.114.167.in-addr.arpa.
     IN      SOA     ns1.example.com. [email protected]. (
1
        ; Serial
3h
      ; Refresh after 3 hours
1h
      ; Retry after 1 hour
1w
      ; Expire after 1 week
1h
)     ; Negative caching TTL of 1 day
;
0.114.167.in-addr.arpa.
      IN      NS      ns1.example.com.
0.114.167.in-addr.arpa.
      IN      NS      ns2.example.com.
0.114.167.in-addr.arpa.
  IN      PTR   example.co.ke.
To find out more about PTR records please visit this link or any other source
7. Updating bind configuration files.
With the four files above in place, we now need to update some values in bind configuration file. Bind service is called named (pronounced name-dee) and it’s configuration file is saved as /etc/named.conf.
-
Use your favourite editor to access the file
[root@dns
	~]# vim /etc/named.conf
-
Under options section, add your ipv4 on the listen-on port 53
section as follows
options
	{
listen-on port 53 { 127.0.0.1; 167.114.169.229; };
-
Comment out the ipv6 line as we wont be using that. Place # infront
of the line
#listen-on-v6 port 53 { ::1; };
-
On the allow-query line, change that argument from 127.0.0.1 to any
– so as to allow queries from any IP. If you wish to allow from a
specific range only, specify the range instead.
allow-query { any; };
- Lastly, add the following to the configuration file and Save:
zone
"example.co.ke" {
type
master;
file
"/var/named/example.co.ke.db";
};
zone
"0.114.167.in-addr.arpa" {
type
master;
file
"/var/named/167.114.169.229.db";
};
zone
"ns1.example.com" {
type
master;
file
"/var/named/ns1.example.com.db";
};
zone
"ns2.example.com" {
type
master;
file
"/var/named/ns2.example.com.db";
};
8. Add the IP of a stable DNS server to the /etc/resolv.conf file. You can use Google’s Ips: 8.8.8.8 or 8.8.4.4 or OpenDNS ips: 208.67.222.222 or 208.67.222.220
Most times your ISP provides a resolver IP already – but you can always change to your preferred ones.
[root@dns
~]# cat /etc/resolv.conf
#
Generated by NetworkManager
search
openstacklocal example.com
#nameserver
213.186.33.99
nameserver
127.0.0.1
nameserver
8.8.8.8
9. Check the configuration and zone files:
To check configratuion file, use the command below. It should display no message if configs are fine
[root@dns ~]# named-checkconfTo check zone files, use named-checkzone command as follows:
[root@dns
~]# named-checkzone example.co.ke /var/named/example.co.ke.db
zone
example.co.ke/IN: loaded serial 1
OK
[root@dns
~]# named-checkzone 0.114.167.in-addr.arpa
/var/named/167.114.169.229.db
zone
0.114.167.in-addr.arpa/IN: loaded serial 1
OK
10. Restart BIND
[root@dns
~]# systemctl restart named
10. Test your DNS server
To wrap it up, use dns utilities such as dig, nslookup and host to test your setup. Here’s an example of dig command usage. A successful query has an answer as shown below.
[root@dns
~]# dig @167.114.169.229 www.example.co.ke
; <<>>
DiG 9.9.4-RedHat-9.9.4-72.el7 <<>> @167.114.169.229
www.example.co.ke
; (1
server found)
;;
global options: +cmd
;; Got
answer:
;;
->>HEADER<<- opcode: QUERY, status: NOERROR, id: 20750
;;
flags: qr aa rd ra; QUERY: 1, ANSWER: 2, AUTHORITY: 2, ADDITIONAL: 3
---------------------------some
output has been truncated -----------------
Try running other commands like the one below within your DNS server and Outside.
[root@dns
~]# nslookup example.co.ke
I absolutely love your blog and find the majority of your post’s to be just what I’m looking for.
Does one offer guest writers to write content to suit your needs?
I wouldn’t mind writing a post or elaborating on some of the subjects you write regarding here.
Again, awesome weblog!
Thanks. Yes, you can write for us. Check out this guide and reach us so we can set you up
Excellent post. I was checking constantly this weblog and I am impressed!
Extremely useful info specially the ultimate phase :
) I maintain such info much. I was looking for this
particular information for a very lengthy time. Thank you and best of luck.
Hello everyone, it’s my first visit at this web site,
and paragraph is genuinely fruitful in support of me, keep up posting
these posts.
Very good written information. It will be valuable to anybody who employess it, as well as yours truly :). Keep up the good work – for sure i will check out more posts.