Introduction
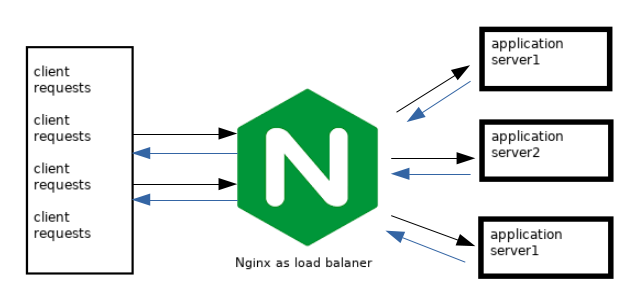
A load balancer is simply a piece of hardware or software that distributes traffic between two or more servers (upstream/backend servers). Load balancing is a common technique used to in deploying high availability applications. The load balancer seats in front of the backend servers and interacts with the public on behalf of the backend servers. The backend servers don’t directly receive client requests. A load balancer is used to implement horizontal scaling.
Nginx is a web server that implements load balancing well and as such is popularly used for this purpose. Today, we’ll see how to create a Nginx load balancer to serve our application deployed in backend servers.
Setup
• A Debian 10 server running Nginx. This will be our load balancer. Its IP is 192.168.100.4 and hostname debian-lb
• 2 Centos 7 servers running our application using Apache. These are the backend servers. Their IPs are 192.168.100.5 and 192.168.100.6. Their hostnames are centos-1 and centos-2
• 2 different html files deployed on each of the backend server. They are different only for demonstration purposes. Normally, the same application files are supposed to be deployed across each backend server.
• A Debian 10 client computer which we will use to access our application. Its hostname is debian-cl
• You need root access for each server.
• Our local domain name will be called application.local and will be pointed to the load balancer’s IP address – 192.168.100.4
NB: Pointing of the domain to the IP will vary depending on how your domain is being hosted. If it is a live domain, you will need to access your DNS management panel and point the A record to the load balancer’s IP address. If it is a local domain name, like ours here is, then you need to point it to the load balancer using the /etc/hosts file in your client computer.
Procedure
The 4 servers should be able to reach each other well. A test for reach-ability can be done using ping. Our load balancer will use round-robin technique of load balancing. For more details on various methods supported by Nginx, please refer to our article on load balancing.
1. On the debian-lb server, install, start and enable nginx web server
root@debian-lb:~# apt-get install nginx
root@debian-lb:~# systemctl start nginx
root@debian-lb:~# systemctl enable nginx
2. On the centos-1 backend server, install, start and enable apache web server.
root@centos-1 ] # yum install -y httpd
root@centos-1 ] # systemctl start httpd
root@centos-1 ] #systemctl enable httpd
Repeat the process for the centos-2 backend server
3. Stop and disable firewalls on all servers. Alternatively, you can allow traffic via port 80 as well as the load balancer’s IP on each firewall instead. This is recommended in a production environment.
root@debian-lb:~# ufw stop; systemctl disable ufw
root@centos-1 ] # systemctl stop firewalld; systemctl disable firewalld
4. Create an index.html file in centos-1 under your root directory, in my case /var/www/html, and add the words “application server one” Create a similar file for centos-2 and add the words “application server two”
5. On the debian-lb server which serves as our load balancer, use your favorite text editor to create a configuration file in /etc/nginx/conf.d and add the following content to it. My configuration file will be called lb.conf
root@debian:~# vi /etc/nginx/conf.d/lb.conf
upstream application {
     server 192.168.100.5;
     server 192.168.100.6;
 }

server {
     listen  80;
     server_name application.local;

location / {
        proxy_redirect      off;
        proxy_set_header    X-Real-IP $remote_addr;
        proxy_set_header    X-Forwarded-For $proxy_add_x_forwarded_for;
        proxy_set_header    Host $http_host;
        proxy_pass http://application;
   }
}
6. Save and test if there are any errors in the nginx configuration.
root@debian-lb~# nginx -t
7. If no errors exist, restart nginx
root@debian:~# systemctl restart nginx
8. Disable the default nginx landing page by removing the default file in sites-enabled folder and restart nginx
root@debian-lb:~#  rm /etc/nginx/sites-enabled/default
root@debian-lb:~#  systemctl restart nginx
9. Access your domain name on a web browser. The expected results is that, the first time you access, the words “application server one” will be displayed on the browser – meaning centos-1 served the request. The second time you access, the words “application server two” will be displayed, meaning centos-2 served the request. This means our configuration of the load balancer was a success.
Troubleshooting
The following are some of the issues you may encounter when trying to get the setup to work:
| Issue | Solution |
When accessing the domain name, the default nginx page shows instead of our application content. | You forgot to remove the default nginx page. Refer to step 8 above |
| Error 502 Bad Gateway | This error shows that for some reason, Nginx couldn’t pass client request to the web servers running the application. In itself, the error is not very informative and to fix it, you need to check the error log for specific errors. The error log is at /var/log/nginx/error.log See below for some errors that may be seen on the error logs. |
*1 connect() failed (113 No route to host while connecting to upstream….) | This error on the /var/log/nginx/error.log file shows that firewalls are preventing access to the upstream servers. Check the upstream servers for open firewalls and close them or allow ports 80 and 443 and load balancer IP access to the servers |
*1 no live upstream while connecting to upstream: …. | This means the upstream servers are not reachable. Check if they are online. If online, check if firewall is live and blocking requests. |
| *1 SSL_do_handshake() failed (SSL: error:1408F10B:SSL routines:ssl3_get_record: wrong version number ) while SSL handshaking to upstream | There isn’t a valid SSL certificate to use with upstream servers. In your lb.conf file, remove the https:// protocol under proxy_pass directive and replace it with http:// |
Great content! Super high-quality! Keep it up! 🙂