K3S is a light weight kubernetes distribution best suited for dev environments and edge computing. However, this is not to say it is not production ready. In fact, personally, I would recommend it for set ups that don’t need much functionality.
Today, we’ll look at how you can quickly setup a Kubernetes cluster with k3s to run your workloads
Prerequisites
- 3 servers running Ubuntu 20.04
- 1 of the servers above will be a master (2core, 4gb, 20GB SSD)
- 2 of the servers will be workers where workloads will be deployed (each has 4 core, 8gb 40GB)
The general set up is that we have a single master and 2 workers. Master will not take any workloads.
You should set up host names for the servers at your DNS manager.
Steps to carry out on the master
Host name of the master is master01.rawle.systems
1.Run apt update
2.Install k3s using the command below. Check out the k3s docs for options you can use during installation.
root@master01:~# curl -sfL https://get.k3s.io | sh -
But for me since I do not want to use traefik ingress controller, I will run the command below
root@master01:~# curl -sfL https://get.k3s.io | sh -s - server --disable traefik
3.Once installation is through, we need to get the server token, with which we will connect other nodes to this master. For K3S, the token is saved at /var/lib/rancher/k3s/server/node-token
root@master01:~# cat /var/lib/rancher/k3s/server/node-token
K10a08827d116591a65a1c028641927967c69cfe82ed4ed34657ec899596abb0558::server:dd64902c256c32fed964606e2ccc9202
Steps to carry on the workers
Host names for the workers are worker01 and worker02
1.Run apt update
2.Using the token obtained above together with he master IP, you can connect the other servers to the master as follows
root@worker01:~# curl -sfL https://get.k3s.io | K3S_URL=https://192.168.0.119:6443 K3S_TOKEN="K10a08827d116591a65a1c028641927967c69cfe82ed4ed34657ec899596abb0558::server:dd64902c256c32fed964606e2ccc9202" sh -
3. Start and enable k3s-agent on the server
root@worker01:~# systemctl enable --now k3s-agent
You may confirm k3s is running by using the command below
root@worker01:~# systemctl status k3s-agent
When you go back to the master and check nodes, you will see 2 nodes are available as follows

4. Next, perform the same steps above on worker02. Check that nodes ready are now 3 as follows

Prevent pods from scheduling on master
Your nodes should now be ready for use. However, to make the workloads be deployed only on worker nodes, we need to taint the master using the command below
root@master01:~# kubectl taint nodes master01.rawle.systems node-role.kubernetes.io/master=:NoSchedule
node/master01.rawle.systems tainted
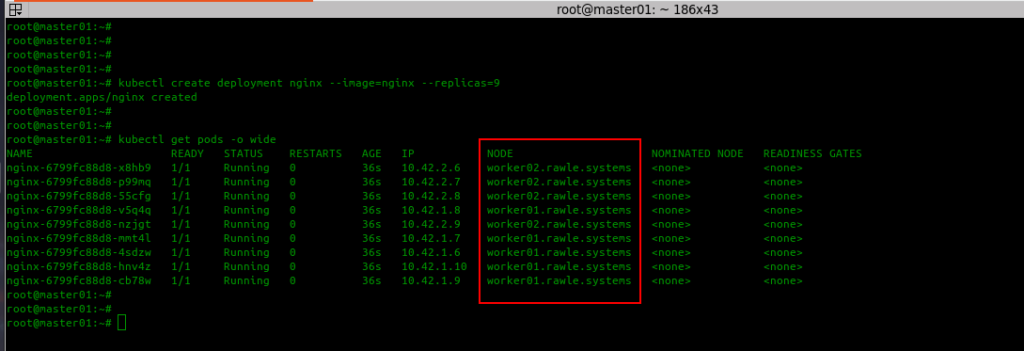
And to demonstrate the effectiveness of this, let us try and deploy several nginx pods and see where they will be scheduled.
root@master01:~# kubectl create deployment nginx --image=nginx --replicas=9
deployment.apps/nginx created
Then check where each pod is deployed.