Downtime can be very expensive and frustrates users. A sure way to prevent downtime is building a cluster for everything in your environment. Ensuring redundancy of various parts of your entire environment ensures you eliminate downtime. One such crucial part that requires redundancy is the database.
For sites or apps that are database driven, database becomes one of the core components that need to be always up for your application to do what it is meant to do. As such, investing properly on your databases availability is crucial. This can be done by creating a highly available database cluster.
In this guide, we will look at how to create a HA database cluster using Percona XtraDB Cluster. We will deploy HAProxy in front of the back-end database servers using Cluster Control. Finally, we will test our database by creating a WordPress installation and pointing it to our cluster database.
The article is meant to be used as a general guide on setting up HA database infrastructure. It does not handle the HA concept satisfactorily as will be noted on the Shortcomings section of this guide. Lets begin!
Prerequisites
- 3 back-end servers for running Percona Database Servers [db1, db2, db3]
- 1 server to run Cluster Control and the Database Proxy (HA Proxy) [controller]
- All 4 servers run on Ubuntu 20.04
- Root Access to all servers is required
- Configure Password-less access to SSH from controller to the database servers
- We’ll need a fifth server to run our WordPress instance for testing. You can use your localhost though!
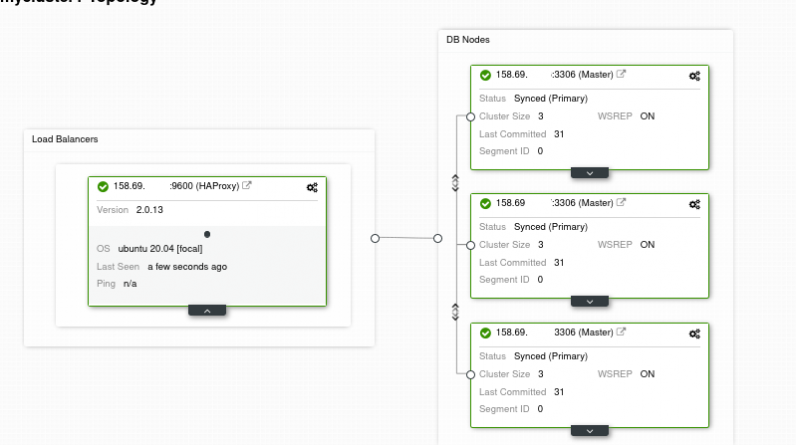
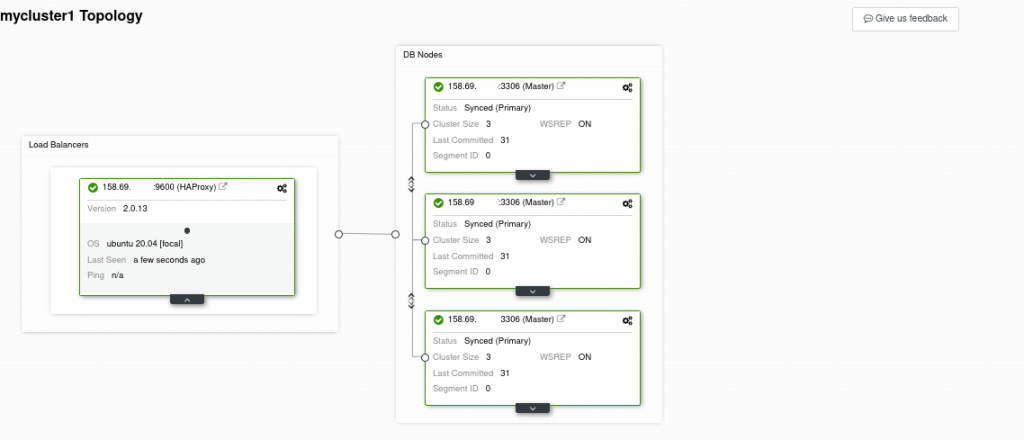
Setup Topology
Setup Cluster Control
Cluster Control will be set up on server called controller.
1.Login to SSH as root and update the server
root@controller:~# apt-get update
2.Run the command below to generate a key for use in Passwordless SSH login between the backend servers and the controller
root@controller:~# ssh-keygen
3. Copy the SSH key on db1
root@controller:~# ssh-copy-id [email protected].**.**
4. Install Cluster Control using the Installer Script provided in the guide below
install cluster control
https://docs.severalnines.com/docs/clustercontrol/installation/automatic-installation/installer-script-install-cc/
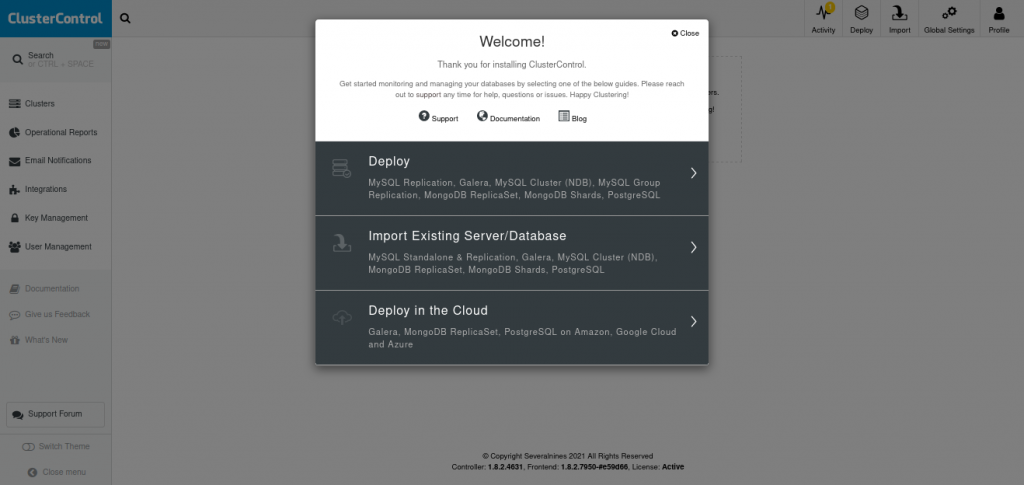
5. Once done, access Cluster Control from your browser through the link http://IP_ADDRESS/clustercontrol
6. Fill in the form provided to create and register a user. Once logged in, you should get the screen below
Setup Back-end Servers
Now, we need to deploy our back-end. We’ll use Percona Database server. With Cluster Control,you have the option to use other Databases such as PostgreSQL, MySQL, MariaDB and many more.
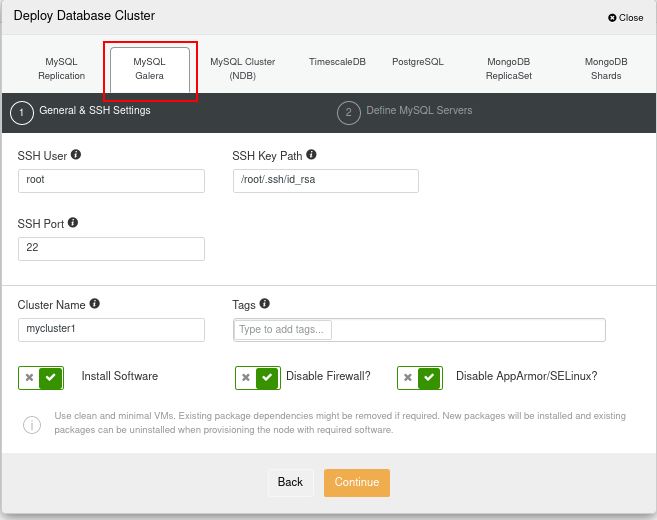
1. On the Welcome screen above, click Deploy
2.Click MySQL Galera tab and fill in the General and SSH Settings below. The SSH user here will be the one used to access all the back-end nodes hence must exist on all nodes. Click the information icon (i) to get more details on each field.
Click Continue once done
3. Select Percona XtraDB under Vendor and type in the MySQL root password you would like configured. This will be setup on all the nodes.
4. On the same page, add the nodes you want connected by typing in the server IP address for each node under Add Node section. They should all show a green tick as shown below
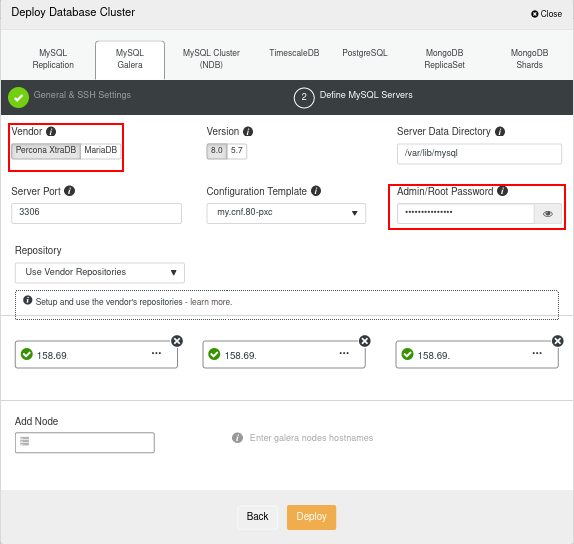
5. Click Deploy and wait for sometime as the installation f your back-ends is being done. This can take 10 to 20 min to complete depnding on yoru network speed.
You can monitor the progress from the Activity tab on your top right under Jobs tab.
Setup Load Balancer
A load balancer sits in front of the back end servers and directs traffic to servers that are online. Any server that is not available will not have traffic directed to it, hence the high availability being ensured.
There are various software that can be used to load balance traffic. In this guide, we will use HAProxy. This is a trusted and tested load balancer of TCP traffic, including that of MySQL databases.
1.On your Cluster Control dashboard, go to Manage >> Load Balancer
2.Select HAProxy tab then on the form that appears, under Server Address, select Controller. This is because we wanted to install HAProxy on the same server as the we installed Cluster Control.
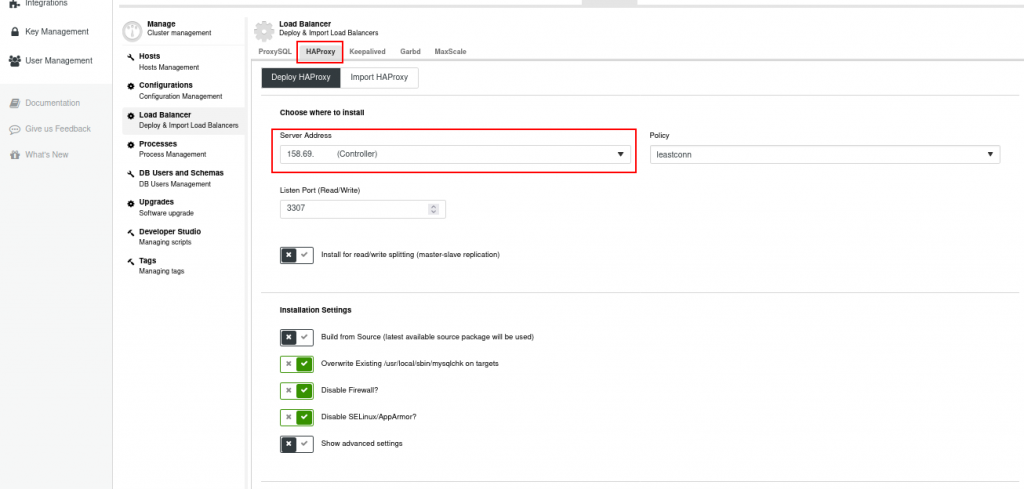
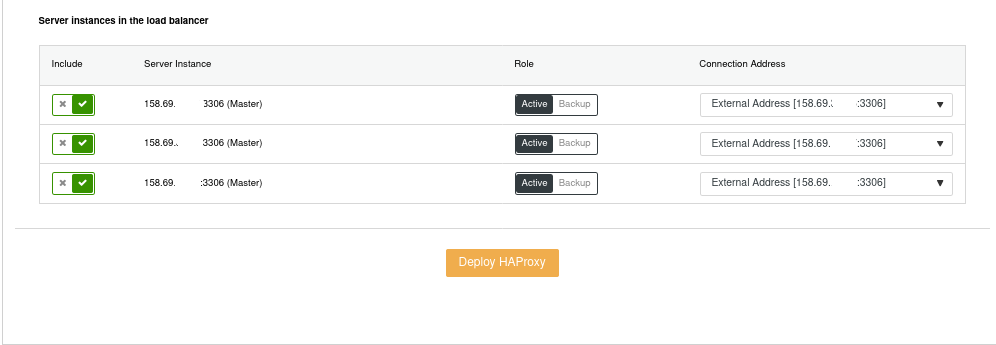
3.Select all the servers to be used on the load balancer and click Deploy HAProxy. Allow some 10 mins.
4. Remote access is automatically allowed on this setup. However, for Percona or MySQL 8.0, you need set the default password plugin to mysql_native_password or else you will see errors similar the one below
ERROR 1045 (28000): Plugin caching_sha2_password could not be loaded: /usr/lib/x86_64-linux-gnu/mariadb19/plugin/caching_sha2_password.so: cannot open shared object file: No such file or directory
To configure default plugin, please refer to the Troubleshoot section of this guide below.
5. Your Cluster should now be ready for use and reachable via your Load balancer IP address through port 3307 (HAProxy is configured to listen to MySQL database connections via this port)
Testing Connectivity
We’ll create a database and user called wordpress and a database with the same name.
1.To create a database, login to your Cluster Control dashboard and click Manage >> DB Users and Schemas
2.Go to Create Database and type in your database name.
NOTE: If this option is not available (not available on community edition of Cluster Control), login to any of your back-end servers and run the command below.
root@db1:~# CREATE DATABASE wordpress;
The database will be created and replicated on all other nodes automatically.
1.To create a user, login to your Cluster Control dashboard and click Manage >> DB Users and Schemas
2.Under Users tab, on your right, click Create New User then fill in the form as below
Username:wordpress
Password:*******
Hostname:%
Under Privileges, use the following setup
Under GRANT: ALL PRIVILEGES
Under ON: wordpress.*
NOTE: The database must be as above, failing to put (.*) will cause database error.
3.You can now test connection to your cluster on terminal by running the command below
mwabini@serv0-rawle:~$ mysql -u root -h 158.69.36.61 -P3307 -p
NOTE: If you bump into any errors at this point, check the troubleshoot section on possible solutions.
WordPress Setup
Now that our cluster is up and running, we can deploy a wordpress instance for testing purposes. You can either deploy the wordpress files on a separate server or your localhost. For this example, I will use localhost.
1.Download WordPress from wordpress.org
mwabini@serv0-rawle:$ cd /var/www/html && wget https://wordpress.org/latest.zip
2. Unzip it and access your wordpress on the browser link to complete installation. Mine is http://localhost/wordpress

3. Click Continue then Let’s Go! Fill in the database connection details. Key thing to note is the hostname should include the IP and port e.g 192.168.0.12:3307

4. Click Submit and complete the wordpress installation process.
Done and Dusted! We have successfully set up a database cluster and used it to connect an wordpress application.
Shortcomings
The setup below should improve database availability but is still not recommended for production. Below are some of the limitations of the setup that make it unsuitable for production as is:
- The HAProxy layer is a Single Point of Failure. If the proxy server goes down, the whole database is inaccessible. Configure redundant proxy servers for production.
- With such a setup, you must ensure your network connection between the servers is very good as delays in the network will cause serious delays on your database connectivity. This however is an issue with all interdependent clusters.
- The setup is not best for geographically separate nodes due to latency between servers. High latency slows down the cluster badly. Use it for servers in the same DC or otherwise very close
- Some features of cluster control are only available on the paid version. The community edition however works well enough for most cases.
Troubleshoot
- Getting ERROR 1045 (28000) when trying to login to my cluster via the load balancer
Error Messages:
ERROR 1045 (28000): Plugin caching_sha2_password could not be loaded: /usr/lib/x86_64-linux-gnu/mariadb19/plugin/caching_sha2_password.so: cannot open shared object file: No such file or directory
or
ERROR 1045 (28000): Access denied for user 'root'@'158.69.36.61' (using password: YES)
Solution
1.Login to SSH on one of the back end servers using
2. Login to MySQL root
root@db1:~# mysql -u root -p
3. Run the command below to verify existing users
select user, plugin from mysql.user;
mysql> select user, plugin from mysql.user;
+----------------------------+-----------------------+
| user                       | plugin                |
+----------------------------+-----------------------+
| wordpress                  | caching_sha2_password |
| backupuser                 | caching_sha2_password |
******************************************************
| s9smysqlchk                | caching_sha2_password |
+----------------------------+-----------------------+
14 rows in set (0.00 sec)

mysql>
4. Change your application users’ plugin using the command below. Replace ‘Your-user-Password’ with your actual user password.
ALTER USER 'wordpress' IDENTIFIED WITH mysql_native_password BY 'Your-user-Password';